

Unit Two Projects
Pinch Pot
Plan
- Using a pinch pot method I created the shape of the piece
- Due to the shape that it took on, I decided it would be good for a plant pot and added the three holes on the bottom
After the first firing I used a lowfire glaze to get the color
Reflection
- I am happy with the shape - I took a long time smoothing it out and I think it paid off
- However, I am not happy with the glaze. I evenly glazed the pot to the best of my abilities, but it turned out very uneven and spotty for an unknown reason. In the future I will make sure that all parts of the piece are glazed evenly


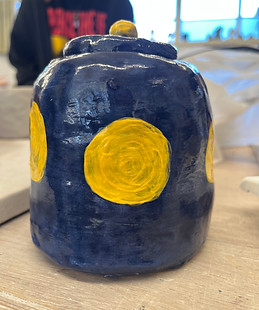
Double Pinch Pot
Plan
- I created two pinch pots of relatively the same size and connected them by scoring, slipping, and smoothing out the connection
- Here I decided that I wanted to make a jar, and cut out a circle from the top to make the lid
- I added a lip around the opening of the jar so the lid would sit well
- I slipped and scored a small ball on top of the lid for a handle
- I used yellow underglaze for the moon and a mixture of purple, blue, and black underglaze for the background
- After the first firing, I used a lowfire clear glaze
Reflection
- I am happy with the glazing - I like how the moons came out and I like the background color
- I am generally happy with the shape of the jar, but I think I could have spent more time smoothing it out
- The main area that I am unhappy with is the lid - it does not fit very well into the jar and I think I could have put more effort into making sure it fit

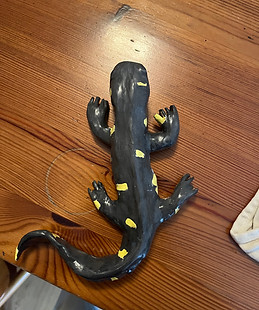
Animal Figurine
Plan
- I made a long coil, thicker at one end than the other, for the body
- I narrowed the tail and positioned it to where I wanted it
- I made all of the legs separately, cutting out small triangles to create the toes, and then slipped and scored them on
- I hollowed out the body both to prevent it from being too thick and to allow it to be a wall hanging
- I used yellow underglaze for the spots, black underglaze for the eyes, and a mixture of black and brown underglaze for the body
- After the first firing, I used a lowfire clear glaze
Reflection
- I am happy with the body - I think the shape came out well and it is working as a wall hanging
- There are a few spots where I missed glazing it enough times and it is not fully covered. In the future I will pay more attention to what areas I have already glazed and what areas need more layers

Historically Inspired / Mini Masterpiece
Plan
- I did not base this project off of any particular stained glass window, but more off of the general shapes found in Renaissance era stained glass in churches. however, I simplified the design quite a bit, as most of those historical stained glass windows are very complex
- I rolled out a slab and cut it in the shape I wanted
- I then used a needle tool to create the design I wanted
- I added a small hole in the back so it could be hung on the wall
- I used a variety of colors of underglaze to create the design, finally painting the back and sides white
- After the first firing, I painted it with a clear lowfire glaze
Reflection
- This piece took a long time, with most of the work coming from the very small spots of underglaze
- For the time and effort it took, I am not entirely happy with the underglazing and I think it could have been neater but I am happy with it for the most part
- I did not make the hole on the back deep enough, so it is not able to be hung as a wall decoration

